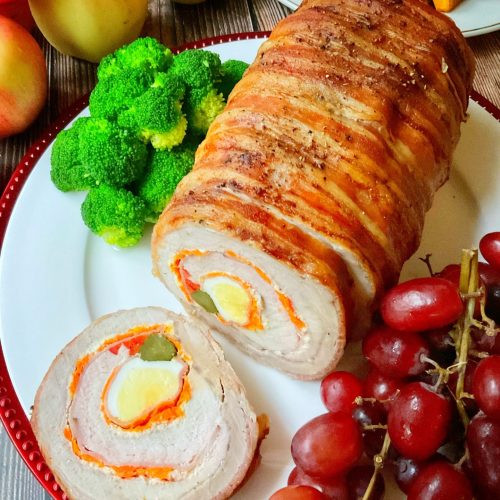
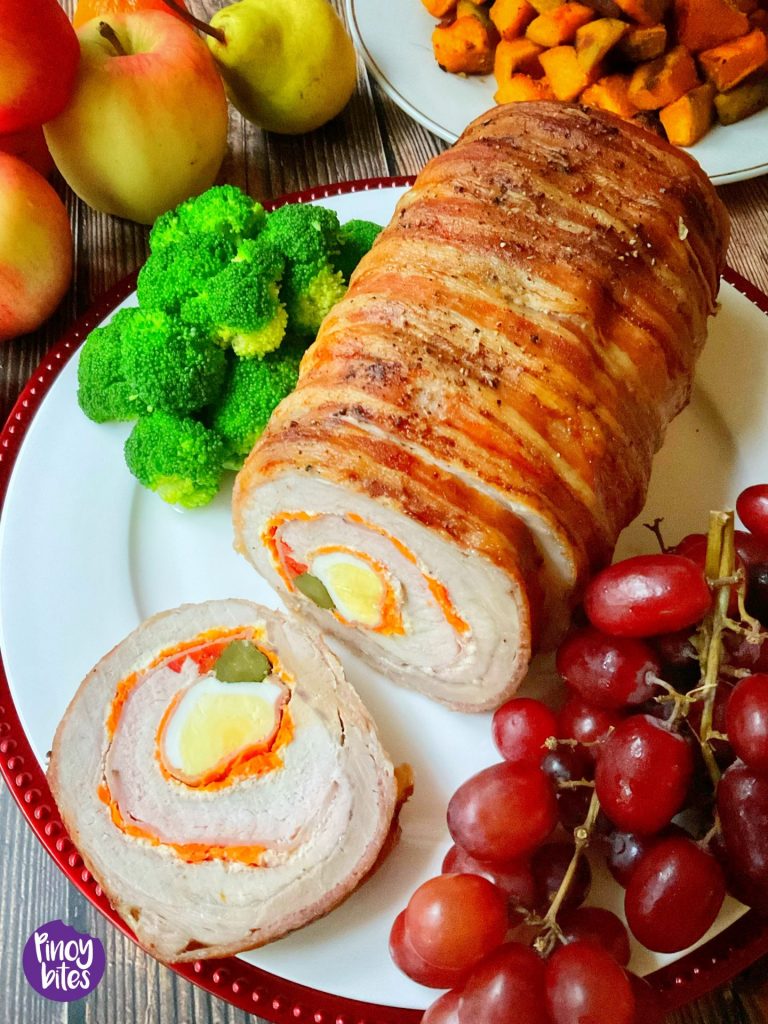
I have been thinking of doing this for sometime now. The idea of a leaner cut of meat that presents well on special occasions is the inspiration behind this. Unlike the fat-laden pork belly, pork loin is just the opposite. It’s lean, so incorporating ingredients that’ll give it moisture is a must.

Choosing the filling ingredients and how to specifically position each layer to render utmost moisture were the main concerns when I was writing my thoughts on a piece of paper. Aside from that and equally important, was to be able to give it a “wow” factor when served. With all these to consider, I was finally ready to give it a go.
This one is a showstopper and definitely fits as a focal point at the dining table. It may look complicated but it’s really very doable. I explained every single step in detail so you can see how manageable it is. Make sure you prep the ingredients ahead and within reach before flattening the meat. Before you know it, in front of you is a very good-looking, juicy and delicious roast.

The Preparation (Unrolling the Pork)
I know it’s quite daunting to tackle the first step. Think of it like unrolling something like a yoga mat. A sharp knife and a stable cutting board are needed for this step. Start by placing the pork on the cutting board, fat side down. Next, position your knife parallel to the board about ½ inch from the bottom of the meat. Begin slicing in the same direction and stop when you reach about ½ inch to the other end. Turn the meat on its side (like unrolling a mat) and continue doing the same thing until the whole loin is completely flat.
Check for any uneven parts and slightly pound the meat on those spots until everything looks even. Now, you’re ready to stuff!
Filling and Rolling
After seasoning with the dry spices, start layering the stuffing in the order it’s written below. Once all the stuffing ingredients are placed (except the bacon), begin rolling the meat. Start by lifting the narrow side nearest you and folding it over the eggs. Gently tuck as you continue rolling towards the end. Place it seam side down then drape the bacon pieces on top, tucking the ends under the meat. Fix any loose ends then secure with the pieces of twine. Now, you’re ready to bake!

Baking
Position the oven rack in the lower-middle area (one spot below the middle rack) and preheat the oven to 375F. Place the baking rack inside a rimmed baking pan lined with aluminum foil. Sit the prepared meat on top and bake initially for 30 minutes. Without opening the oven door, lower the temperature to 350F and cook for an additional 2 hours or until the internal meat temperature is about 140F to 145F. Remove the roast from the oven, tent with foil and rest for 30 minutes before carving. The internal temperature is slightly lower because of the carry over cooking time as it cools. It’ll come out moist and juicy. Delicious!


Bacon-Wrapped Stuffed Pork Loin
Equipment
- Kitchen twine (6-7 pcs cut into about 24 inch lengths)
- Roasting/half sheet pan
- Baking rack that fits the pan
- Aluminum foil, to line the pan
- Aluminum foil, to tent the meat after baking
Ingredients
- 3 to 3 ½ lbs pork loin
- ½ teaspoon salt
- ½ teaspoon ground black pepper
- 1 teaspoon garlic powder
- 1 teaspoon onion powder
Filling
- 8 oz 250g Philadelphia cream cheese, softened (I used ¾ cup only)
- 1 small carrot grated
- 6 to 9 pcs thinly-sliced deli ham enough to cover
- 2 hard boiled eggs cut in half lengthwise
- ½ red bell pepper sliced into thin strips
- 1 large whole sweet pickle quartered lengthwise
- 1 375 g pack bacon (I used low-sodium bacon)
Instructions
To Prepare the Pork Loin:
- Place the pork loin on a cutting board, fat side down. The idea here is to flatten the entire loin into about ½ inch thickness, in ONE PIECE. It’s like unrolling a mat until it’s completely flat. Take your time and do little cuts until you’re comfortable.
- With a sharp knife, start by cutting (lengthwise) about ½ inch thick from the bottom of the meat. Make sure the knife is parallel to the cutting board and try to make it as even thickness as possible. As you near the end, stop once you reach the same thickness (½ inch). Turn the meat sideways and continue cutting (“unrolling”) until the meat is completely flattened.
- Grab a meat mallet and slightly pound any uneven parts of the loin. The thickness should be the same throughout. Now, you’re ready to season the meat.
Season and Assemble the Roast:
- Combine salt, pepper, garlic and onion powder in a small bowl. Mix and rub through the inside part of the meat. Set aside.
- Next, spread the softened cream cheese then sprinkle the grated carrots on top. Place a single layer of ham on top of the carrots, making sure the entire meat is covered. A bit of overlapping is fine.
- With one narrow end nearest you, line the halved eggs along the narrow side (4 pieces total) leaving about one inch of free space nearest you.Then, line the pickles next to the eggs and the bell peppers next. It’s like making a sushi roll.
- Gently roll the meat, from the narrow end nearest you. Tuck and tighten every turn to make sure the fillings stay in place. Once done, position the rolled meat seam-side down. Season the outside with some ground black pepper.
- Arrange the bacon pieces side by side until the whole length of the meat is covered. Tuck the bacon ends at the bottom. To easily do this, start by positioning the middle part of the bacon at the very top of the rolled meat and tuck the ends using both hands. Slightly overlap the bacon (about ¼ inch) to adjust for shrinkage while baking.
- Place the rack inside the baking sheet. Arrange the twine pieces about an inch apart at the center of the baking rack. Gauge the length of the entire roast in determining the twine positions. Starting from the center of the rolled pork, tie the twine tightly and repeat until all the strings are used up. Trim any loose strings with scissors. Adjust the twine positions depending on the size of your meat.
- Preheat the oven to 375F. Position the oven rack in the lower-middle slot. (If the middle part of your oven is on the 3rd position, place the rack on the 2nd)
- Bake for 1 hour then lower the temperature to 350F and bake for another 2 hours or until the internal temperature is 140F – 145F.
- Tent with foil and let rest for 30 minutes before carving. Serve with ketchup, if desired. This is great served with rice, pasta and some salads or steamed vegetables. Enjoy!


