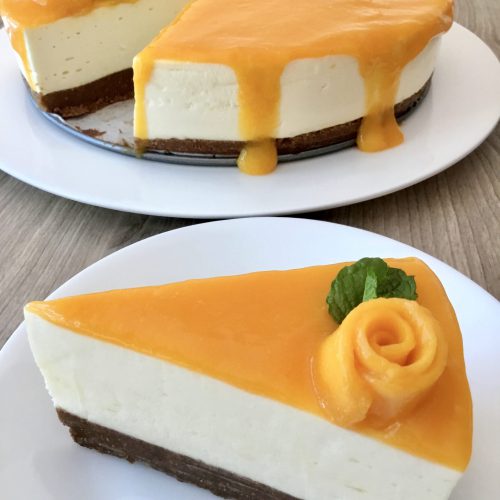
No-Bake Mango Cheesecake
A scrumptious no-bake cheesecake that is creamy, delish and bursting with sweet mango flavour. It's a showstopper too!
Ingredients
For the Crust:
- 3 Tablespoons sugar
- 3 / 4 cup melted butter
- 2 Tablespoons unsweetened cocoa powder
- 400 g pack or 2 ¾ cups graham cracker crumbs
For the Creme:
- 1 / 2 cup sugar
- 2 envelopes Knox unflavored gelatin*
- ¼ cup cornstarch
- ¼ cup water
- 1 cup evaporated milk
- 3 egg yolks slightly beaten
- 1 tsp pure vanilla extract optional
For the Filling:
- 1 cup cream cheese 250g or 8oz, at room temperature
- 1 pint 473ml heavy whipping cream 33-35%mf
- 3 Tablespoons icing sugar powdered sugar**
For the topping and decor:
- 3 ripe Ataulfo mangoes divided
- 1 Tablespoon sugar
- 1 teaspoon lemon juice
- Mint leaves for garnish optional
Instructions
- FOR THE CRUST: In a bowl, combine sugar and melted butter. Add cocoa and graham crumbs. Mix until well combined and press mixture on a springform pan with a removable bottom. You can also use 2 small pie plates.
- FOR THE CREME: Combine sugar, gelatin and cornstarch in a saucepan and mix well. Slowly add water, milk and egg yolks while stirring to get rid of clumps. Cook over medium heat until thick. Turn the heat off and add vanilla. Transfer to a bowl and cover with plastic wrap directly on the creme to avoid a “skin” forming. Set aside to cool.
- Using the whisk attachment of a stand mixer, beat the heavy cream until it turns into whipped cream. Transfer to a bowl, cover and put in the fridge.
- Next, whip the cream cheese until very smooth.
- Mix in the prepared creme that’s been cooled (to the cream cheese) and whip until well combined and smooth. Then, add the whipped cream. Gently fold until smooth and well blended. You can also use the whisk attachment to fold the whipped cream.
- Pour mixture evenly on the prepared crust then spread mango puree (see below) on top. Decorate with mango “roses”, if desired. (see instructions below)
- Refrigerate until set (at least 2-4 hours) and enjoy!
- FOR THE MANGO PUREE: Peel and remove the pit on one mango. Coarsely chop the flesh. Place in the blender, add sugar and lemon juice. Blend until smooth.
- TO MAKE MANGO ROSES (optional): 1. Cut the mango in halves, being mindful of the big pit in the middle. Then, scoop the mango flesh using a big spoon. Slice lengthwise, as thinly as possible. 2. On a plate/fruit cutting board, take a piece of sliced mango and roll it tightly like a jelly roll. This will serve as the center of the rose. 3. Wrap another piece (“petal”) on the center part, making sure to cover the seam from the last “petal”. Repeat until the desired flower size is achieved. Make as many mango “roses” as you want until you use up all the mango slices.
Notes
*Knox gelatine comes in a small box with 4 small envelopes/pouches inside. You only need 2 pouches for this recipe.
*Don’t be intimidated in making this yummy cheesecake. This recipe is made up of different layers so I tried to group each part to make it easier to put together. A promise of deliciousness awaits at the end.
*To cut clean slices, dip your knife in some hot water and wipe dry before cutting into the cheesecake.